Installing ImageMagick on Windows
ImageMagick is a powerful tool for image manipulation and processing. While you can build it from source, the easiest method is to download and install a pre-built binary. This guide will walk you through the installation process.
Download Options
You can download ImageMagick from their official website at https://imagemagick.org/script/download.php#windows
Choose the appropriate binary for your system architecture:
- Windows 32-bit: ImageMagick-[version]-Q16-x86.exe
- Windows 64-bit: ImageMagick-[version]-Q16-HDRI-x64.exe
Installation Steps
- Download the appropriate installer for your system architecture
- Run the installer executable
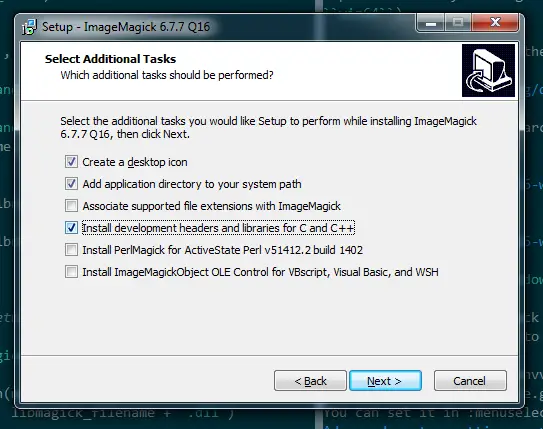
- During installation, you’ll see the following configuration screen:

The installation options screen allows you to:
- Add application directory to your system path
- Install development headers and libraries for C and C++
- Install legacy utilities
- Associate supported file extensions
- Install FFmpeg
- Install PerlMagick
Important Notes
⚠️ Check your Python runtime architecture: Ensure it matches your ImageMagick installation. A 32-bit Python installation cannot load a 64-bit dynamic library.
Development Headers
If you plan to use ImageMagick with other development tools:
- Install the development headers and libraries for C and C++
- These are required to link Visual Studio or other development environments with ImageMagick

Environment Variables
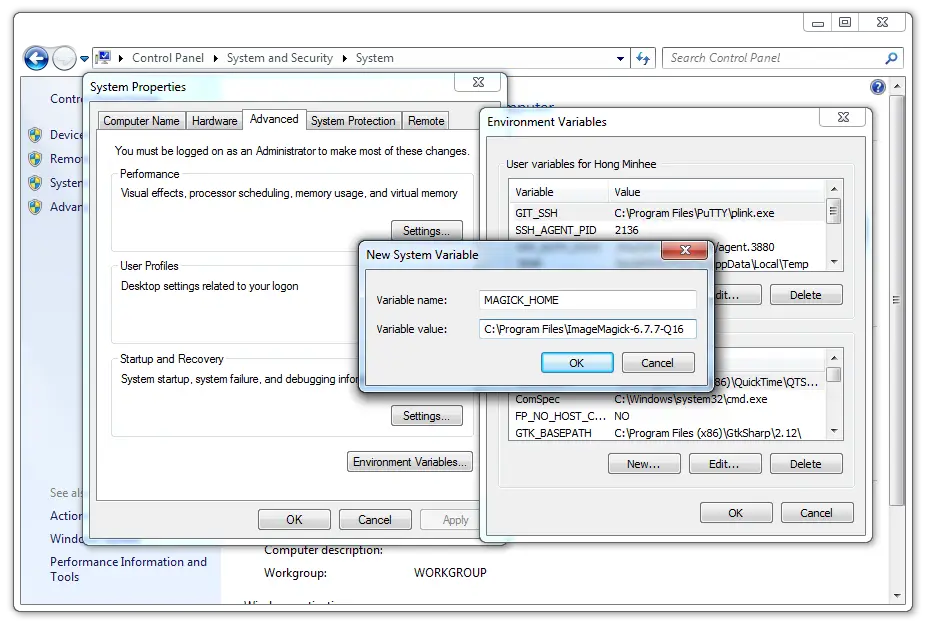
ImageMagick uses the MAGICK_HOME environment variable. You can set this up in two ways:
-
System Environment:
- Navigate to System Properties > Advanced > Environment Variables
- Add
MAGICK_HOMEpointing to your ImageMagick installation directory - Typical path:
C:\Program Files\ImageMagick-[version]-Q16
-
Explicit Path:
- You can explicitly specify the path in your code
- This is useful when you need to target a specific ImageMagick installation
Path Verification
After installation, verify that ImageMagick is properly installed by:
- Opening a new command prompt
- Running
magick --version - Checking if the output shows the installed version
Troubleshooting
If you encounter issues:
- Verify that your system architecture matches the installed version
- Check if all required dependencies were installed
- Ensure environment variables are properly set
- Restart your system after installation to ensure all changes take effect
Next Steps
After installation, you can:
- Start using ImageMagick from the command line
- Integrate it with your development projects
- Explore the various image manipulation capabilities